SpringBoot 笔记 (五): 缓存
1.JSR107介绍
1.核心概念
JSR107这个规范有五个核心概念分别是:
- CacheProvider 它用来管理缓存的Manager也就是用来创建,删除,管理,配置CacheManager 的
- CacheManager 是用来管理各个缓存,创建,删除,管理,配置Cache的
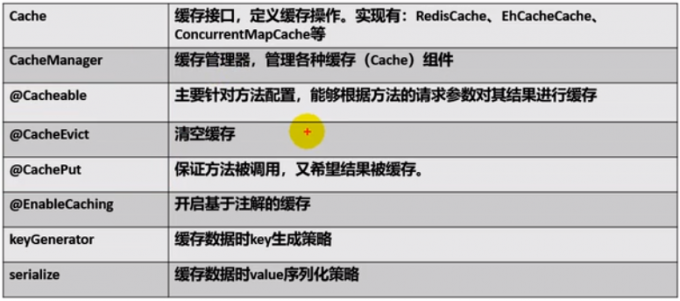
- Cache 是各个具体的缓存组件
- Entry 是缓存中具体的一个缓存项
- Expire 缓存的过期时间
2.导入包
- javax.cache.cache-api
- javax.cache.cache
2.Spring缓存抽象
spring保留了两个核心的概念就是 CacheManager 和 Cache 用来支持并简化 JSR107 技术。支持JSR107的注解,以及自带一些注解。
这几个注解其实都是标注在方法上面,主要说一些这几个注解:
- Cacheable 就是标注该方法在执行查询的结果是被缓存起来的,一般来说就是在dao的select的时候调用。
- CacheEvict 这个一般放在删除某些数据的时候我们必须清空缓存让缓存失效
- CachePut 这个住哟啊用于更新操作,不然的话缓存无法同步更新。
- EnableCache 就是开启注解。
3.搭建项目工程
1.给主类加上@CacheEnable
2.给方法加上@Cacheable
将方法的运行结果进行缓存;以后再要相同的数据,直接从缓存中获取,不用调用方法;
CacheManager管理多个cache组件的,对缓存的真正CRUD操作在cache组件中,每一个缓存组件有自己唯一一个名字;
几个属性:
- cacheNames/value:指定缓存组件的名字
- key:缓存数据使用的key;可以用它来指定。默认是使用方法参数的值1-方法的返回值
- 编写SpEL;#id;参数id的值#ae#pe#root.args[e]

- keyGenerator:key的生成器;可以自己指定key的生成器的组件id 注意:key/keyGenerator:二选一使用
- cacheManager:指定缓存管理器;或者cacheResolver指定获取解析器
- condition:指定符合条件的情况下才缓存;
- unLess:否定缓存;当unLess指定的条件为true,方法的返回值就不会被缓存;可以获取到结果进行判断
- unless=”#result==null”
- sync:是否使用用异步
[^针对dao包开启sql调试日志]: logging: level: com: example: bootcache: dao: debug
3.自动配置原理
1. CacheAutoConfiguration 自动配置类
2.@Import({CacheAutoConfiguration.CacheConfigurationImportSelector.class}) 导入了自动配置选择类
3. CacheConfigurationImportSelector.selectImports() 方法导入依赖
1
2
3
4
5
6
7
8
9
10
| "org.springframework.boot.autoconfigure.cache.GenericCacheConfiguration"
"org.springframework.boot.autoconfigure.cache.JCacheCacheConfiguration"
"org.springframework.boot.autoconfigure.cache.EhCacheCacheConfiguration"
"org.springframework.boot.autoconfigure.cache.HazelcastCacheConfiguration"
"org.springframework.boot.autoconfigure.cache.InfinispanCacheConfiguration"
"org.springframework.boot.autoconfigure.cache.CouchbaseCacheConfiguration"
"org.springframework.boot.autoconfigure.cache.RedisCacheConfiguration"
"org.springframework.boot.autoconfigure.cache.CaffeineCacheConfiguration"
"org.springframework.boot.autoconfigure.cache.SimpleCacheConfiguration"
"org.springframework.boot.autoconfigure.cache.NoOpCacheConfiguration
|
4.具体哪一个配置类会生效就看我们这些配置类的condition
1
2
3
| @ConditionalOnClass({Cache.class, EhCacheCacheManager.class})
@ConditionalOnMissingBean({CacheManager.class})
@Conditional({CacheCondition.class, EhCacheCacheConfiguration.ConfigAvailableCondition.class})
|
5.我们可以打开调试,那么再启动的时候就会打印出我们自动配置的日志 (debug: true)
搜索CacheConfiguration 可以看到
1
2
3
| SimpleCacheConfiguration matched:
- Cache org.springframework.boot.autoconfigure.cache.SimpleCacheConfiguration automatic cache type (CacheCondition)
- @ConditionalOnMissingBean (types: org.springframework.cache.CacheManager; SearchStrategy: all) did not find any beans (OnBeanCondition)
|
那么也就是说我们没配置的时候默认是 Simple 的Cache
1
2
3
4
5
6
7
8
9
| @Bean
public ConcurrentMapCacheManager cacheManager() {
ConcurrentMapCacheManager cacheManager = new ConcurrentMapCacheManager();
List<String> cacheNames = this.cacheProperties.getCacheNames();
if (!cacheNames.isEmpty()) {
cacheManager.setCacheNames(cacheNames);
}
return (ConcurrentMapCacheManager)this.customizerInvoker.customize(cacheManager);
}
|
默认返回的是 ConcurrentMapCacheManager 这个CacheManager 给容器中注册缓存管理器。
6. ConcurrentMapCacheManager 分析
这个缓存管理器的主要作用分析一下,其他的基本都类似:
1
2
3
4
5
6
7
8
9
10
11
12
13
14
15
16
17
18
19
20
| public class ConcurrentMapCacheManager implements CacheManager{ //所有的缓存管理器都继承了这个CacheManager
//里面最重要的方法就是 getCache 方法 这个方法就是创建和获取缓存组件!!组件
@Nullable
public Cache getCache(String name) {
Cache cache = (Cache)this.cacheMap.get(name);
if (cache == null && this.dynamic) {
ConcurrentMap var3 = this.cacheMap;
synchronized(this.cacheMap) {
cache = (Cache)this.cacheMap.get(name);
if (cache == null) {
cache = this.createConcurrentMapCache(name);
this.cacheMap.put(name, cache);
}
}
}
return cache;
}
}
|
7.Cache的执行流程
1.获取缓存组件
在被注解的方法调用之前会去Cache组件按照cacheName获取缓存组件 (注意不是缓存数据而是组件),也就是去 CacheManager 的 getCache() 方法,如果没有Cache组件我们就new一个Cache组件
2.获取key
待会说
3.获取缓存数据
接着使用ConcurrentMapCache.lookup()`来查找缓存数据,也就是使用 key 来查找,默认就是方法的参数。但是又是怎样生成key的呢?
我们在 lookup() 上面打上断点,然后我们往上翻一下栈帧就能找到 findCachedItem:491, CacheAspectSupport 接着我们可以在这个方法中看到他生成了 key 也就是 bject key = this.generateKey(context, result);
1
2
3
4
5
6
7
8
| protected Object generateKey(@Nullable Object result) {
if (StringUtils.hasText(this.metadata.operation.getKey())) {
EvaluationContext evaluationContext = this.createEvaluationContext(result);
return CacheAspectSupport.this.evaluator.key(this.metadata.operation.getKey(), this.metadata.methodKey, evaluationContext);
} else {
return this.metadata.keyGenerator.generate(this.target, this.metadata.method, this.args);
}
}
|
上面的逻辑就是 获取到key的值 ,直接使用,没有key的值需要生成。好那么这个生成的 generate() 最后是在 一个 public interface KeyGenerator 接口中定义的,那么接下来这个实现类其实就是 SimpleKeyGenerator 在栈帧中是可以看出来的。
1
2
3
4
5
6
7
8
9
10
11
12
13
14
| public static Object generateKey(Object... params) {
if (params.length == 0) {
return SimpleKey.EMPTY;
} else {
if (params.length == 1) {
Object param = params[0];
if (param != null && !param.getClass().isArray()) {
return param;
}
}
return new SimpleKey(params);
}
}
|
最后生成了 key 值:生成策略 :
- 如果没有参数就是 Simple对象
- 有一个参数就是这个东西
- 多个参数就是参数传入Simple的封装
如果我们在缓存中获取到了数据那么我们就不需要运行方法了,如果是没有的话我们必须运行方法执行下面的 put 操作,但是注意一点就是我们通篇使用了 AspectJ 完成的。
4.没有值put进去
使用了 ConcurrentMapCache.put() 方法来put新的值。
所以说我们的@Cacheable代码的调用时机有两个:分别是运行之前需要查询一次缓存看有没有,以及在没有时候需要运行方法并把结果放到缓存中。所以我们不能在注解中使用#result el表达式,还有注意一点的就是这些注解都是放在Service层的别放到了Controller中,因为Controller每次都会被访问。
4.自定义key
1.使用注解中的key属性
我们可以采用 SPEL 表达式,这里举一个简单的例子,我们的可以要用方法名加上参数 Empl[1] 我们就可以用 #root.method.name+’[‘ +#id+’]’ 来完成
2.重写 keyGenerator()
1
2
3
4
5
6
7
8
9
10
11
12
13
| @Configuration
public class KeyGeneratorConfig {
@Bean
public KeyGenerator keyGenerator(){
return new KeyGenerator() {
@Override
public Object generate(Object target, Method method, Object... params) {
return method.getName() + Arrays.asList(params).toString();
}
};
}
}
|
然后在 keyGenerator的属性写上 我们的bean的id
5.@CachePut 注解
这个注解就是在update数据的时候使用的,在更新数据库的同时同期的更新缓存,这个注解的代码都是在方法运行以后才开始运行的,也就是我们代码之运行一次,然后他的原理就是更新后的数据重新放到缓存里面而不是真的去查那条缓存然后更新。所以说有一个非常值得注意的地方就是如果我们的@Cacheable注解使用了自定义的key的时候我们必须保证他们两个的key一样 不然的话是没有办法同步更新数据库和缓存的。
6.@CacheEvict 缓存清除
- 这个删除默认的情况就是删除指定的key的缓存而非当前Cache组件中所有的缓存。
- 我们可以指定 allEntries 属性来指定是否删除所有的缓存
- beforeInvocation 指定缓存是在方法之前还是之后运行,这个东西的影响就是我们的方法抛出异常的时候缓存能否被清除,显然后者是不可以的。
7.@Caching 综合注解
这个注解其实就是上面三个注解的综合,也就是我们可以定义综合注解。
1
2
3
4
5
6
7
8
9
10
11
12
13
| @Caching(
cacheable = {
@Cacheable(cacheNames = "empl")
},
put = {
//多key缓存
@CachePut(cacheNames = "empl",key = "#id"),
@CachePut(cacheNames = "empl",key = "#result")
},
evict = {
@CacheEvict(cacheNames = "empl")
}
)
|
8.@CacheConfig类上注解
这个注解可以配置一些公共的项目,然后我们下面的方法就可以不用配置一些公共的东西了。这个注解是配置在类上面的。
1
| @CacheConfig(cacheNames = "empl")
|
4.使用redis缓存中间件
1. 配置redis客户端
2.配置redis-starter
1
2
3
4
5
6
7
8
9
10
11
12
13
14
| <dependency>
<groupId>org.springframework.data</groupId>
<artifactId>spring-data-redis</artifactId>
<exclusions>
<exclusion>
<groupId>org.slf4j</groupId>
<artifactId>jcl-over-slf4j</artifactId>
</exclusion>
</exclusions>
</dependency>
<dependency>
<groupId>io.lettuce</groupId>
<artifactId>lettuce-core</artifactId>
</dependency>
|
3.配置redis地址
1
2
3
| spring:
redis:
host: localhost
|
4.注入两个redis的客户端
- redisTemplate 基本的redis客户端
- stringRedisTemplate 简化字符串操作的
1
2
3
4
| @Autowired
RedisTemplate redisTemplate;
@Autowired
StringRedisTemplate stringRedisTemplate;
|
5.Redis常见的五大数据类型
String(字符串)、List(列表)、Set(集合)、Hash(散列)、ZSet(有序集合)
1
2
3
4
5
| stringRedis Template.opsForValue()[String(字符串)]
stringRedis Template.opsForlist()[List(列表)]
stringRedis Template.opsForSet()[Set(集合)]
stringRedisTemplate.opsForHash()[Hash(散列)]
stringRedis Template.opsForZSet()[ZSet(有序集合)]
|
6.string以及对象序列化
1.string类型的操作:
1
2
3
4
5
6
|
stringRedisTemplate.opsForValue().append("name", "lwen");
stringRedisTemplate.opsForValue().append("age", "20");
stringRedisTemplate.opsForList().leftPush("mylist", "hello");
stringRedisTemplate.opsForList().leftPush("mylist", "world");
|
2.对象的操作:
1
2
| Employee employee = new Employee(10, 20, "lwen");
redisTemplate.opsForValue().set("objStr", employee);
|
注意一点的就是这个对象必须要实现序列化接口否则会报错的!!!

测试成功以后会发现我们的数据成了这个样子,value还好说应该是序列化导致的,但是key其实也是序列化,我们的string 类也是可以被序列化的。这不是我们希望的而是采用json的格式。那么我们可以配置序列化的规则,去 RedisAutoConfiguration 找对应的默认序列化配置。
1
2
3
4
5
6
7
8
9
10
11
12
13
14
15
16
17
| @Bean
@ConditionalOnMissingBean(name = "redisTemplate")
public RedisTemplate<Object, Object> redisTemplate(
RedisConnectionFactory redisConnectionFactory) throws UnknownHostException {
RedisTemplate<Object, Object> template = new RedisTemplate<>();
template.setConnectionFactory(redisConnectionFactory);
return template;
}
@Bean
@ConditionalOnMissingBean
public StringRedisTemplate stringRedisTemplate(
RedisConnectionFactory redisConnectionFactory) throws UnknownHostException {
StringRedisTemplate template = new StringRedisTemplate();
template.setConnectionFactory(redisConnectionFactory);
return template;
}
|
可以看到这里就是配置了两个 redisTemplate 我们主要就是让他重新返回新的 redisTemplate 并且在这些模板里面加上我们的序列话规则就好。
我们去 redisTemplate 中看看会发现 afterPropertiesSet 这个方法中有一段逻辑:
1
2
3
| if (this.defaultSerializer == null) {
this.defaultSerializer = new JdkSerializationRedisSerializer(this.classLoader != null ? this.classLoader : this.getClass().getClassLoader());
}
|
意思就是说我们没有配置 defaultSerializer 的话默认使用的是jdk的序列化规则。所以我们自己配置一个 redisTemplate 加上我们自己的规则即可。把上面配置 redisTemplate 的代码复制到我们的JavaConfig中。修改一下,首先我们定位到 private RedisSerializer<?> defaultSerializer; 看到这个地方就是redis的序列化器,我们看看他的具体实现就能找到我们需要的序列化器(Ctrl+H)。

1
2
3
4
5
6
7
8
9
| @Bean
@ConditionalOnMissingBean(name = "redisTemplate")
public RedisTemplate<Object, Object> redisTemplate(
RedisConnectionFactory redisConnectionFactory) throws UnknownHostException {
RedisTemplate<Object, Object> template = new RedisTemplate<>();
template.setConnectionFactory(redisConnectionFactory);
template.setDefaultSerializer(new Jackson2JsonRedisSerializer<>(Employee.class));
return template;
}
|

使用jackson序列化之后的,就很正常!!!
7.自定义CacheManager
上面的操作我们都是在test中进行的,我们手动的拿到了 redisTemplate 但是实际上我们在项目中使用的时候我们是不关心我们用的是什么 redisTemplate 也就是我们没办法定义序列化规则了,实际上主要是因为我们的CacheManager被自动配置了。那么去找一下这个自动配置类 RedisCacheConfiguration 里面就是把 CacheManager 放到了容器里。
1
2
3
4
5
6
7
8
9
10
11
12
| @Bean
public RedisCacheManager cacheManager(RedisConnectionFactory redisConnectionFactory,
ResourceLoader resourceLoader) {
RedisCacheManagerBuilder builder = RedisCacheManager
.builder(redisConnectionFactory)
.cacheDefaults(determineConfiguration(resourceLoader.getClassLoader()));
List<String> cacheNames = this.cacheProperties.getCacheNames();
if (!cacheNames.isEmpty()) {
builder.initialCacheNames(new LinkedHashSet<>(cacheNames));
}
return this.customizerInvoker.customize(builder.build());
}
|
但是注意的一点就是我们的CacheManager是每一个Service很可能不太一样的这是因为我们的泛型不一样,否则的话我们有时候就没办法反序列化回来,所以我们现在必须在每一个Service类上面使用 @CacheConfig 注解中的CacheManager属性来制定使用哪个CacheManager。并且我们还需要一个默认的缓存管理器不然的话会导致注入异常!
!!!注意 :在springBoot 2.0的版本我没有找到配置序列化的地方了,并且我发现不用配置序列化key是正常的,value是二进制的,但是我觉得没问题,因为生成CacheManager不是用template而是采用builder的方式,所以说我们可以不用配置序列化并且我们的Redis的缓存管理器的类的继承层次和其他几个也不太一样,个人感觉是更好的封装吧,不用再手动配置了。
8.手动操作缓存
我们可以直接手动注入一个缓存管理器,然后我们使用管理器获取一个缓存,接着我们剧可以手动的对缓存进行操作了。